Why Does Midscene Split Locate and Action into Two Steps?
The previous post, What Actually Happens Inside a Single Midscene aiAct Call?, walked through the plan-execute loop inside aiAct, but one stop was deliberately left unopened — “finding the element”.
That stop is arguably the most technically distinctive part of Midscene. Most vision Agents either trust the coordinates the AI gives them, or fire one more AI request to refine the location. Midscene takes a different path: separate the locate step out, and try four fallback layers in order from cheapest to most expensive.
This post is about that.
Starting Point: Why You Can’t Trust the AI’s bbox Unconditionally
Recall the AI response from the previous post:
1 | <action-type>Tap</action-type> |
That bbox is something the AI returns in passing during planning — at that moment the model is doing four things at once: understanding intent, choosing an action type, generating action params, and estimating the element’s position. Locating is just one of the four sub-tasks; it isn’t going to be very precise.
(One clarification up front, since it trips people up: the bbox isn’t something the model returns every round. Only when certain conditions hold does the planning prompt ask the model to return a bbox; the moment the user signals “I want more precision,” that field is dropped from the prompt. The exact conditions are covered in Level 1 below. So when I say “the bbox isn’t accurate,” I mean the cases where the model actually returned one.)
In practice:
- For large buttons (> 80 px), bbox is usually good enough
- For mid-sized elements (40–80 px), bbox often misses by 20–50 pixels
- For small buttons (< 40 px), bbox may miss the element entirely — a direct click would land on the neighbor
Worse: the program has no way to detect this offset at execution time. It takes the coordinate and clicks; even clicking the wrong element looks “successful”. Only on the next round, when the AI sees the screen didn’t change as expected, does it realize something went wrong. That delayed perception makes the loop burn many wasted iterations.
So the real problem is not “make the AI return a more accurate bbox” — that’s the ceiling of what the planning model can do, and throwing more tokens at it gives diminishing returns. The real problem is decoupling “locating” from “executing” at the architecture level, so locating can be optimized independently.
The Architectural Split: Every Action Becomes Locate + Action
TaskBuilder is the module responsible for this. Its job is simple: split each PlanningAction into multiple ExecutionTasks, and pull every field that needs locating into its own standalone Locate task.
Take an Input action returned by the AI:
1 | { |
TaskBuilder breaks it into two tasks:
1 | Task 1: Locate task { prompt: "search box", bbox: [...] } |
Task 2’s locate is initially empty — it waits for Task 1 to finish and, via a callback called onResult, gets the precise coordinate filled in:
1 | Locate finishes → returns { center: [500, 40], text: "Search..." } |
So the Action task itself never touches the AI’s rough bbox — it always sees the coordinate produced by the Locate task.
One layer needs spelling out here, or the next section will read like a contradiction. The Action layer only ever sees the Locate task’s output, but how that coordinate was produced — trusting the bbox directly, a DOM query, a cache replay, or even a fresh AI locate call — is all sealed inside the Locate task (that’s the four-level Fallback in the next section). In other words, whether the bbox gets used is the Locate layer’s business; the Action layer doesn’t care. So “the Action task never touches the bbox” and “the system does use the bbox in some cases” are both true at once — they just have different subjects: the former is about the Action task, the latter about Level 1 of the Locate task.
How Does TaskBuilder Know Which Field to Locate?
There’s an engineering problem here: different actions have very different param shapes.
Taphas onlylocateInputhaslocate + value + modeDragAndDrophasfrom + to— both need locatingAndroidBackButtonhas no params at all, no locating needed
Hard-coding if (type === 'Tap') extract locate / else if (type === 'DragAndDrop') extract from and to would mean editing TaskBuilder every time someone adds an action. Midscene takes a different approach: each action defines its params with a Zod Schema, and fields that need locating are marked with a special type MidsceneLocator. TaskBuilder doesn’t care what the action is called — it just scans the schema:
1 | const locateFields = findAllMidsceneLocatorField(action.paramSchema); |
Adding a new action only requires marking its locator fields with getMidsceneLocationSchema() in the schema; TaskBuilder picks them up automatically. This internalizes extensibility in the type system instead of in a chain of if-branches.
After the Split: A Four-Level Fallback Chain
When a Locate task runs, it tries four locating mechanisms in order — cheapest first, stop at the first hit:
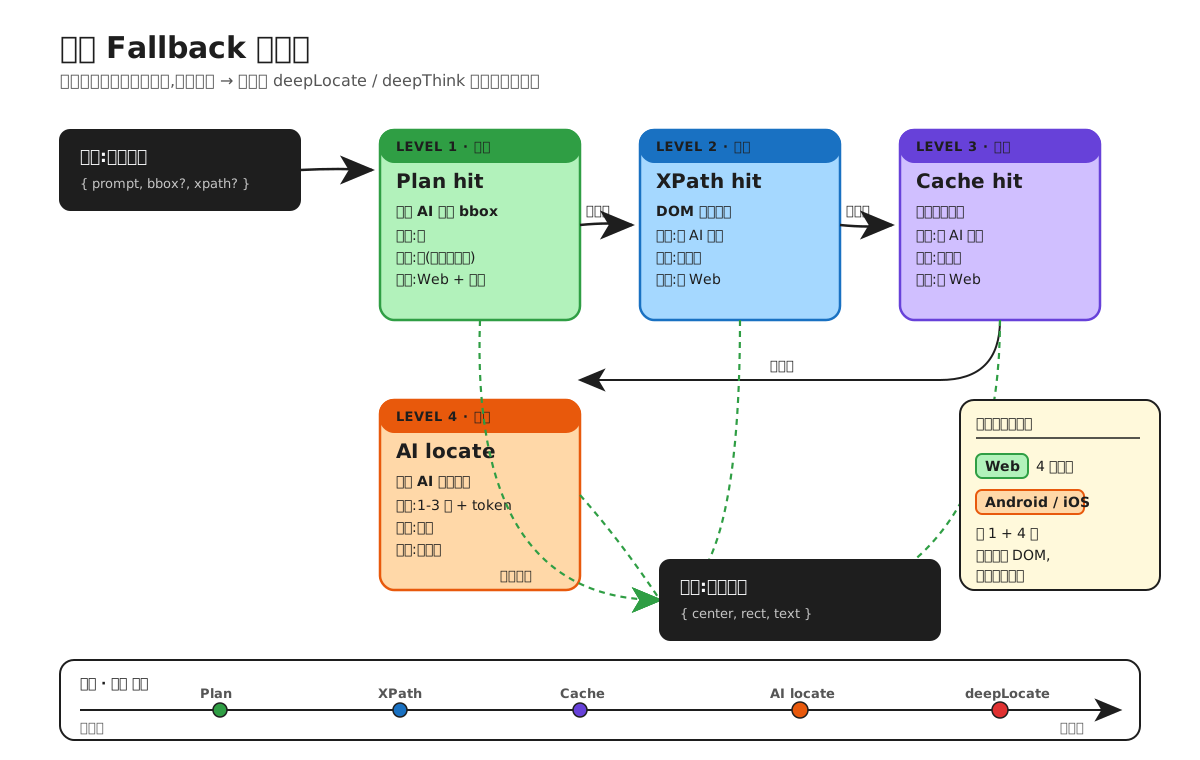
Let me walk through them.
Level 1: Plan hit — zero cost, trust the AI’s estimate
Take the bbox the AI returned during planning and turn it into an element coordinate directly:
1 | ifPlanLocateParamIsBbox(param) → matchElementFromPlan(param) |
It’s essentially a format conversion: bbox [x1, y1, x2, y2] → { center: [x, y] }. No AI call, zero cost.
But as we already said, the bbox isn’t very accurate, so when is this level safe to use? Answer: off by default. Only when both of these conditions hold does the prompt ask the AI to return a bbox during planning, and only then does this level apply:
- deepThink is not enabled
- The same model handles planning and locating (different models may have incompatible coordinate spaces)
That is, includeBboxInPlanning = !deepThink && noIndividualLocateModel. Whenever the user explicitly asks the system to “think harder” (turns on deepThink), this level is skipped and the locate cascades directly to the lower levels. Note that deepLocate does not affect whether this step is enabled — it changes how the bbox is used after it is returned, which is covered below.
Why keep this level at all? Because for large buttons and simple layouts, the AI’s bbox is plenty good. Saving one AI call saves one or two seconds of latency. It’s an “optimistic assumption + explicit opt-out” trade-off: go fast by default, and let users flip one config to switch to the slower-but-more-accurate path when they need it.
Level 2: XPath hit — zero AI call, DOM-precise location
If Plan hit is not in play, or if the user wrote an XPath into the cache from a previous run, the system uses XPath to look the element up in the DOM directly:
1 | interface.rectMatchesCacheFeature({ xpaths: [param.xpath] }) |
Precision is pixel-level (read straight from the DOM node’s getBoundingClientRect()), and the cost is zero AI calls — just one DOM query.
But this level only works on Web — rectMatchesCacheFeature is an optional method on AbstractInterface, and only the Web adapters (Playwright / Puppeteer / Chrome extension) implement it. The Android / iOS adapters don’t.
Using XPath rather than pixel coordinates is itself a key design choice: even if the page layout changes, as long as the DOM node still exists, XPath can still locate it. That keeps the cache stable across iframes, virtual lists, and dynamic layouts (the repo’s repeated iframe-aware xpath and node cache commits speak to this).
Level 3: Cache hit — zero AI call, reuse historical results
If the same element was located before, TaskCache already holds its signature (XPath + surrounding context). On a hit, the historical coordinate is reused directly:
1 | matchElementFromCache(taskCache, cacheEntry, ...) |
Precision is pixel-level, cost is zero AI calls. The difference from XPath hit is the source of the XPath: XPath hit uses “the XPath hint the AI gave during this round of planning”; Cache hit uses “a record from a previous full run”.
This level is also Web-only (it internally relies on XPath verification).
The cache strategy has four modes: read-write (both ways), read-only (read only, typical for CI), write-only (write only, useful on the first run), and false (off entirely). CI typically runs in read-only — guaranteeing that test cases follow “the path that was last reviewed”, instead of suddenly passing or failing because the AI’s locate result swung on this run.
Level 4: AI locate — the last-resort backstop
If none of the first three hit (or none of them are enabled), the locate cascades to this final level: fire a dedicated AI request just for locating.
1 | service.locate(param, { context: uiContext }, modelConfig) |
This prompt has exactly one job — find the element. No planning burden, no action selection, no param generation; the model’s full attention is on “find the search button in this screenshot”. Precision is an order of magnitude better than the bbox the planning step handed back in passing.
The cost is 1–3 seconds of latency plus a few hundred to a few thousand tokens. But as the last-resort backstop, it guarantees that any scenario eventually yields a usable coordinate.
What Each Platform Actually Has Available
1 | Web (Playwright/Puppeteer): plan hit → XPath → cache → AI locate (4 levels) |
Mobile has no DOM, so the middle two levels are skipped. And even plan hit gets skipped often on mobile (lots of small buttons, higher probability that bbox is off), so in practice mobile mostly lives on “AI locate as the main path”. That also means mobile’s locate latency is typically 1–2 seconds higher than Web’s — a platform-capability difference, not a Midscene implementation issue.
When You Want Even More Precision: deepThink and deepLocate
The four-level Fallback is the default behavior. If users need even more precision (complex pages, small elements, occlusion), they can flip two “amplified modes”.
deepLocate: Split Locating Into Two AI Calls
deepLocate’s core idea is: instead of asking the AI to find a small element in a full-screen screenshot, first frame the region, then locate precisely inside it.
1 | AI call 1: AiLocateSection |
The analogy is “find the street first, then find the house number”. When the search region covers more than 50% of the screen, the second call crops the image to the target region — cutting tokens and improving precision (the model doesn’t have to split attention across irrelevant pixels).
The cost is, of course, double the AI calls and double the latency. So deepLocate is off by default; it only kicks in when the user explicitly asks for it via aiAct('xxx', { deepLocate: true }).
deepThink: Deepening the Planning Stage
deepThink affects the planning stage, not the locating stage. It does three things:
- Decomposes the task into a sub-goal list (
subGoals), so the AI thinks through multiple steps in one shot - Keeps the last 2 screenshots in conversation history so the AI can compare “before vs after” (normal mode keeps only 1)
- Disables plan hit — since the AI is decomposing sub-goals, the planning stage no longer hands back a bbox in passing; subsequent locating is forced down to more accurate layers
Importantly: deepThink by itself does not trigger the AiLocateSection + AiLocateElement two-stage locate — that’s only triggered by deepLocate. They can be turned on independently, or stacked:
1 | agent.aiAct("...", { deepThink: true, deepLocate: true }); |
Stacked, you get “sub-goal decomposition in the planning stage + two-stage AI in the locating stage”, but the two mechanisms are orthogonal.
How the Three Interact
Remember the plan hit conditions earlier — “no deepThink + same model”. deepThink directly disables plan hit (because it’s asking the AI to break down sub-goals, so it can’t hand back a bbox in passing); deepLocate doesn’t affect whether plan hit is enabled, but it changes how the plan bbox is used — when deepLocate is on, the plan bbox is treated only as a “search region hint”, not as the final result, and the locate still flows down to AiLocateSection + AiLocateElement.
The effect still holds: as soon as the user signals “I want more precision” (via either deepThink or deepLocate), the plan bbox is never trusted directly. One avoids returning the bbox at planning time; the other returns it but doesn’t treat it as the result.
This design — “the user picks the precision, the system adjusts the Fallback starting point automatically” — is more flexible than hardcoding three tiers like “standard / high-precision / extreme”. The user is really choosing a starting point, not a mode.
One Picture of the Whole Locating Stack
1 | low precision ←———————————————————————————————→ high precision |
Pick the starting point by scenario:
| Scenario | Suggested config | Where hits usually land |
|---|---|---|
| Large buttons, simple page | default | plan hit, mostly |
| Replay after one successful run | default + cache | cache hit, mostly |
| Complex page, small elements | { deepLocate: true } |
straight to AiLocateSection + Element |
| Multi-step complex tasks | { deepThink: true } |
sub-goal decomposition + deepened locate |
| Maximum precision | { deepThink, deepLocate } |
all optimizations stacked |
Turn It Around: What If Locate and Action Weren’t Split?
If you don’t split them, four kinds of problems show up — all rooted in letting the bbox the planning model tossed off drive the click directly.
Locate precision gets dragged down by the planning task, and can’t be optimized on its own. Without the split, the only coordinate you have comes from a model doing four things at once. In practice: large buttons (> 80 px) are fine, mid-sized elements (40–80 px) miss by 20–50 pixels, small buttons (< 40 px) can miss entirely and click the neighbor. Once Locate is its own task, you can give it stronger strategies — a dedicated AI locate, deepLocate’s two-stage locate — instead of hammering at the planning model’s ceiling.
Errors surface late, and the loop spins. Click on a raw bbox, miss, and the program still thinks it “succeeded” — it only finds out next round, when the AI notices the screen didn’t change. That delayed perception burns wasted loop iterations.
You lose the four-level Fallback’s cost tiering. The split is what makes the chain possible. Without it there’s only one road — “trust the bbox” — with no Plan hit → XPath → Cache → AI locate ladder from cheap to expensive: simple pages can’t skip the AI call, and complex pages have no pixel-level DOM/cache backstop.
Caching and stable regression fall apart. XPath hit and Cache hit — the two zero-AI, pixel-level levels — depend on locate being pulled out so a signature can be written and reused. Without the split there’s no stable historical signature, and the
read-onlycache in CI (which guarantees “the path that was last reviewed”) has nothing to stand on; locate results drift with the AI’s whim every run.
In one line: splitting decouples “finding” from “executing”, so locating can grow its own strategies, be cached, and fall back in tiers — and the Action task only ever receives a precise coordinate, not a rough estimate.
Wrap-up
What’s actually hard about a vision Agent isn’t “clicking” — it’s “finding”. Midscene’s engineering trade-offs on that point come down to three sentences:
- Split — Locate and Action are split into two steps; the Action task never touches the AI’s bbox itself, it only consumes the coordinate the Locate task outputs — whether and how the bbox gets used is sealed inside that one level of Locate
- Layer — four-level Fallback tries cheapest first, stops on hit, falls through to the next layer otherwise
- Tunable — users can skip the cheap layers and jump straight to a high-precision starting point with a single
{ deepLocate: true }, no “mode” switching needed
Competitors either don’t do AI locating at all (Playwright) or do a single-shot vision-based locate (Browser-Use, Computer Use). Midscene is one of the few solutions that builds a multi-layer locating system, where every layer can be toggled independently and freely composed.
Together with the previous post, What Actually Happens Inside a Single Midscene aiAct Call?, that covers the two main beams of Midscene’s engineering — the plan-execute loop and layered locating. A few more chunks remain (Zod Schema as the core contract, multi-model composition via ModelConfigManager, cross-process collaboration via Bridge mode); maybe another time.
Why Does Midscene Split Locate and Action into Two Steps?
http://quanru.github.io/2026/05/26/Why-Midscene-Splits-Locate-and-Action